Showing posts with label Admin. Show all posts

Sunday, March 15, 2015

, , ,

Using the New Process Builder - Part 3 - Adding Scheduled Actions to a Process


This is part of the series - Using the New Process Builder

This time let us create a scheduled action for a process
My requirement is when - an Account is created with Rating Hot, after an hour, I will generate an email alert to notify the account owner.

*Note: (I have a custom picklist 'Account Rating' on my Account object with values - Cold,Warm, Hot)

Scheduled actions can be used for Business use cases like:

  1. When a Case remains open for more than 2 days, send an email alert to the owner for attending the case.
  2. Auto update any field after some time of a record creation etc.

For us, let us create a new Process - name it Process to 'Account Create Email Alert'.

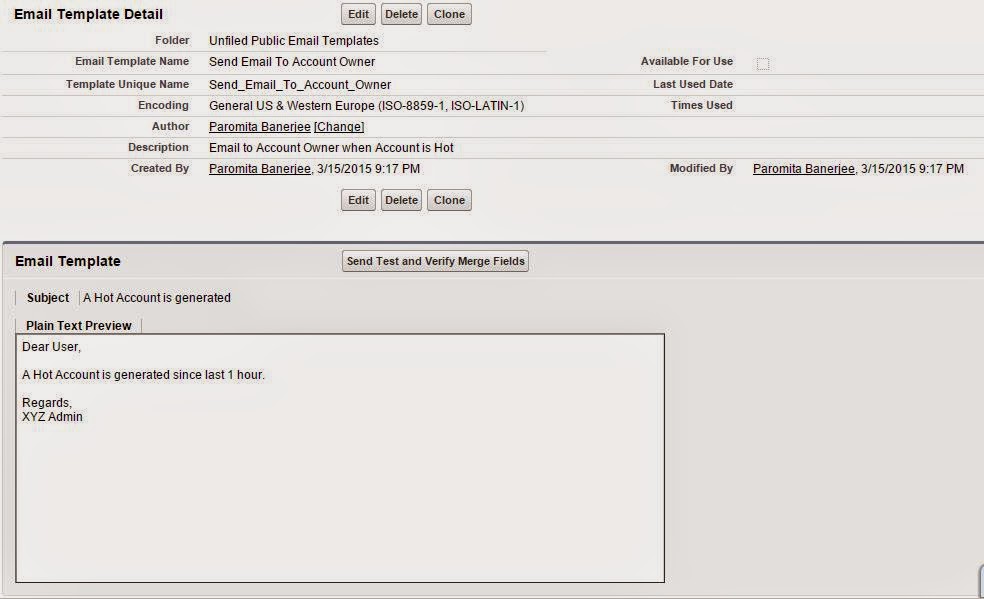
First let us create an Email Template we will use for the process.


Create the Email Alert, we need to create an Email Alert on the Account object, with Process Builder only Email Alerts on the object for which the process is being created is available for use. Also remember, if you configure an email alert to be sent from an organization-wide email address, that email alert isn't supported in flows and processes.


Now we come to the actual process.

Step 1: Create a New Process, we name it 'Account Create Email Alert' add a nice description as well :)


Step 2: Add the Account object to the process, we want to have the process working on Account create/edit.


Step 3: Add a criteria, we check the 'Account Rating' to be Hot, we check both on Account creation as well as on Account update.


Do select 'Do you want to execute the actions only when specified changes are made to the record?' as Yes. Only on selection of this the Scheduled action is enabled. This setting is similar to the setting 'created, and any time it’s edited to subsequently meet criteria' used for workflows.


Step 4: Now we add the schedule, we add a schedule of 1 hour after the Account is Last modified.


Step 5: Let us add the final step, that is, the scheduled action. The email alert we created.


Step 6: All done, we activate the process.

Step 7: To check the Scheduled action we can see the 'Paused and Waiting Interviews' under Workflow & Approvals -> Flows. Basically, Salesforce creates a flow in result of a process to handle the scheduled task. Notice, the 'Workflow' type in the Flow created, different from the usual 'Flow' or 'Autolaunched Flow'


To do a test, we create a new Account and mark it as Hot


Wait for an hour and voila! I receive an email alerting me that a new Hot Account is created.


See the time, exactly and hour after I created the Account. :)

We can do the same by updating an exisitng account and marking the same as Hot. This will work as we selected the 'Do you want to execute the actions only when specified changes are made to the record?'

Next Post: We do a field update in a process.

Thursday, March 12, 2015

, , ,

Using the New Process Builder - Part 2 - How to version control an existing Process in Process Builder.


This is part of the series - Using the New Process Builder

Today, we learn how to update existing Processes. 
Salesforce has brought in version controlling with Processes.
It is similar to what we do with say word documents, we create initial versions and then with each change/update we increase the version of the document.

Similarly, when you have already created a process and then want to make some changes/amendments to the same process, you end up creating a new version and activate this new version.

Let us see with the simple process we created earlier.
Let's say I want to update the Task subject we had set earlier from 'Please work on the JA' to 'Please work on the Job Application'.

First, let's see what we already have in the Process Builder, from the All processes view, click on 'Manage Versions' for the process 'Assign Task on Job Application creation' we created.


You see all the existing versions you have and the only one which is currently active. Obvious enough, only one version at a time can be active.


This is the Version History, Salesforce maintains a version history for all processes you create and if you want to delete any old versions the same can be done from here.

Now, we update our process. 

Step 1: Click on the process name and you see the process as we had completed it last time.


Step 2: Click on the Clone button on top right of the process.

Step 3: We should choose the option 'Version of current process' as we want to update the same process and generate a new version of it.
In other cases, you can choose to create a new process cloning the existing one and append additional steps to the new process.
Here, we update the existing one.


Step 4: Fill in the Name of the process same as before and a description and click Save. 

Step 5: Now you have the same process in editable mode and can edit what you want in the process. I choose the Immediate action of creating the task.

Step 6: I update the subject in the Task fields for record creation


Step 7: Important! This is important - You need to activate the new version for it to be working. 
A warning tells you that other active versions will now be deactivated and the new version works as the current active process. This is exactly what you want so click Ok and proceed.


The new version will become the latest active version and the others remain as Inactive versions.


Now, I create a new Job Application and see the Task created for it. 
Voila! The new Task reflects the new changed Subject.


So, now we know how to Version control a Process and work with its latest version.

Next Post: We learn how to use the Scheduled Task in a process and create some time-based processes.

Saturday, February 14, 2015

, , ,

Using Hierarchical Custom Setting to your Advantage


Salesforce gives you many a construct to make your life easier and present your users a very customized and relevant UI to work on.
To begin my Salesforce post, I will start with such a one - Hierarchical Custom Settings.
The Salesforce Hierarchical custom settings gives you a way to use the Salesforce profile and user variations to make your UI more relevant and useful to a particular user or type of user.
To demonstrate the power of Hierarchical custom settings, let us take up a very simple and basic example.
I have a custom object called Survey in my org. The object records are visible to all users in the org, however, I want only a specific type of user - Recruiters to be able to delete any irrelevant survey.
Even as a recruiter deletes a survey, I have a set of additional logic running behind the screen to do so.
I override my standard Survey detail page with a Visualforce page to begin with, as I want some additional UI customizarions.
To begin with, I remove the standard delete button from my Survey page layout.

I just add the below to my Visualforce page, to display the basic fields on the Survey Detail Page

<apex:page standardController="Survey__c">
  <apex:detail relatedList="false" />
</apex:page>

Now, as any type of user I will only see the 'Edit' and 'Submit for Approval' buttons on the Survey detail page

Now, we go ahead and create a new Hierarchical Custom Setting to be used to make my Visualforce page display a Delete button only for a Recruiter.

We create a new Checkbox field in the Custom settings

With 'Manage' we set the 'canDeleteSurveyRecords' value to true/checked only for a Recruiter

Now, a very important aspect of Hierarchical Settings.Your next thought may come to the point, that your org or any org may have several Profiles and hundreds of users to work with.
Do we set the fields of a custom settings for all the profiles and users ?!
The Answer is NO.
We use the Default Organization Level Value of a Hierarchical custom setting.


In our case we want it to be false for any one else so we leave the check box unchecked.

Now we change our visualforce page, I have added an additonal text just to print the value of the settings for convenience
<apex:page standardController="Survey__c">
  <apex:detail relatedList="false" />
  <apex:form >
  <apex:pageBlock>
  <apex:pageBlockSection >
      <apex:outputText label="Value on Hierarchy Setting" value="{!$Setup.UserAccessSettings__c.canDeleteSurveyRecords__c}"/>
      <apex:commandButton value="Delete" rendered="{!$Setup.UserAccessSettings__c.canDeleteSurveyRecords__c}"/>
  </apex:pageBlockSection>
  </apex:pageBlock>
  </apex:form>
</apex:page>
This does nothing, just makes the commnadbutton 'Delete' rendered based on the value of the Hierarchical custom setting - canDeleteSurveyRecords field.
Now, we login as System admin the page will look like
However, as a Recruiter, I see

So, with intelligent use of Hierarchical Custom settings, you can customize your visualforce pages, with no additional lines of logic in your page.
Similarly, you can branch out your Apex code and and its flow based on a User or a User profile using the very effective Hierarchical Custom settings.

Hope this helps you to design more intelligent and manageable pages and classes.

In my next post, I will be talking about how to make your email templates display your desired information.